Tuesday 15 December 2015

Artist Research - Documentary Photography

Artist Research - Documentary Photography

Henri Cartier-Bresson -

Henri Cartier-Bresson is was a French photographer who assisted in the development of street photography and was the co-founder of Magnum Photography. In addition to this, he is referred to as the father of modern photojournalism. The three images below come from Henri Cartier-Bresson's documentary series; The Decisive Moment. The Decisive Moment has been defined as a photograph which is taken at a precise moment which depicts the entirety of a story or action. 


Ed Thompson

Ed Thompson is a British photographer and his work focuses on different cultures and lifestyles. His work focuses on many different areas and he is mostly known for his documentary style photography. The three images below come from one of his documentary series known as Cowboy Church.


Comparison -

The two photographers and the way that they present their documentaries are very different. Firstly, Henri Cartier-Bresson obviously photographs in black and white whereas Thompson captures his images in colour. In addition to this difference, Thompson seems to stay with his topic more whereas Cartier -Bresson appears to stray further away from the original topic. In my opinion, I think that Thompson's work is more effective as it is easier to see what he is documenting as the images that he has captured are closer to the original topic and all the images relate more to each other. In comparison to this, Cartier-Bresson's images appear to be less related to each other and it is more difficult to see what is being documented by just looking at the images whereas you are able to detect a type of Western American theme when you look at Thompson's work, even when you are unaware of the actual topic of documentary.

Documentary Photography - Edward Thompson

Documentary Photography - Edward Thompson

Ed Thompson is a British Photographer who focuses on Documentary. I really like his work and am hoping to use it as inspiration when I capture my own series of documentary photographer. I like all his sets of work but my particular favourite set is the one called 'Cowboy Church'. I feel that this set of documented images are very effective and interesting and feel that they clearly present the topic in which they are supposed to be documenting. I really like the series as it shows a lot about the lifestyle of the people in the images, for example, it shows the weather, their surroundings, their clothing and their activities.

Below shows some of the images that are included in the 'Cowboy Church' documentary photography series.


Define - Documentary Photography

Define - Documentary Photography

Documentary Photography - Refers to a form of photography which is both relevant and significant to either historical events or every day life. It is photography which documents historical moments or points within individual's lives.


Four Annotated Images

The images below show documentary photography and present a type of life style. I really like that it is obvious that the images are connecting and that they are related. These images have been captured by the documentary photographer Corey Arnold.


Thursday 10 December 2015

Photoshop - Retouching

Editing - Retouching

In today's lesson, we used photoshop to retouch portraits. I retouched an image which I captured during my studio portrait shoot. I really liked this image as an original but think that it looks even more effective in the new edited version. Below shows a screenshot of my photoshop page during the editing process.


Firstly, we edited the basic flaws of the image. To do this I followed the below method -

1. Open the image and select Image, mode and then CMYK colour. 
2. When this has opened, go to channels and select yellow.
3. Press cmdA and then cmdC.
4. Then, go back to layers and press cmd alt Z and then cmdV.
5. Then rename the yellow layer 'Flaws' and press cmdV to invert.
6. Following this step, change 'normal' to 'soft light' and set the opacity to 50%.
7. Then, select the colour white and select the paintbrush tool and paint the desired areas of the image.

Then, we followed the previous method by altering any blemishes on the subject. To do this, we -

1. Press cmdJ to copy the background and rename the new layer 'Blemishes'.
2. Then select either the healing brush or spot healing brush which is on the menu on the left hand side of the screen.
3. Then select an area of clear skin and then paint over the spots or blemishes on which are in the image. 


Above is my original image.

Above is my edited image. I think that these edits are helpful when editing and photographing for the topic of portraiture as it helps to make adjustments and also allows imperfections to be fixed. In my opinion, the ability to edit out things like blemishes is helpful as it helps in the portrayal of the subject and gives a clear representation of what the individual is usually like and their appearance is therefore not altered by things which are not permanent and not usually there like spots and blemishes. In addition, I think that the image is more eye-catching and looks better due to the fact that the subjects skin appears to be clearer and the overall image is lighter than the original which I think looks effective. I also think that the edits help to make the image appear more professional and striking to the audience's eye. 

Tuesday 8 December 2015

Lighting for Portraiture in the Studio

Low Key Lighting for Portraiture

1. Place the snoot over the mono-block light
2. Use the light reader to determine the correct camera settings.
3. For our shoot, I set the camera to ISO 200, f/stop 16 and the shutter speed of 1/125.

During the session on low key lighting, I experimented with taking portraits using this type of lighting and the above camera settings. Below shows some of my outcomes from the session. I really like how the images suggest an element of mystery due to the fact that they are quite dark and therefore appear to be quite dramatic.

I then edited my original images which are shown below to give them a black and white filter. In my opinion, the edited versions look much more effective as the edits help to show the highlighted areas as well as the shadowed areas. I also edited the image by increasing the saturation and also altering the curves to make the overall image brighter to therefore help the subject appear more striking and attract the audiences eye more. I also prefer the edits as I believe that the black and white filter helps to portray the element of mystery that is presented in the portraits which are captured with the low key lighting. Overall, I really like the outcome from the session and feel as though the lighting has helped to create a more dramatic photograph.

Although I like the original image and its composition, I feel that the image was more successful when it had been edited using photoshop.

With the above images, I really like the way that the light has been manipulated in order to make the main light be on the subjects face. This therefore helps to draw the audiences eye to this area as the main focus point of the image. I like the edit as I think that it has been successful in brightening the illuminated area of the image. 

I really like the composition of this image and like the element of shadow which is present within the image.

I especially like the edited version and feel it is a more successful image than the original. I like the way that the element of shadow is still present and like how, using the edit, I have managed to brighten the image and also by doing this, give certain areas of the image, such as the hair and the hand, more definition.

I like this image and like the alternative way of the photograph being taken as a landscape shot. I think that in this image, this is effective as it has allowed more negative space to be created either side of the subject's face. 

I really like this edit which was done using photoshop. I like how I have managed to enlighten the skin tones as this does not only draw more attention to the face, but also makes the shadows more apparent on the face. I think that these shadows look very effective and add interest to the image. I achieved the position of the shadows by manipulating the positioning of the low key lighting in the studio. 

Low Key Lighting - Contact Sheet

Low Key Lighting - Contact Sheet


Monday 7 December 2015

Lighting Techniques for Portraiture (studio)

Lighting Techniques for Portraiture

The choice of lighting will influence the viewers perception of the subjects mood in a portrait. 

High Key Lighting - Uses predominantly light tones. It is often used to portray upbeat moods. 

Low Key Lighting - This set up usually consists of a three-point lighting set up. Predominantly uses darker tones.

Snoot - A snoot is a tube or similar object that fits over a studio light of a portable flash which allows the photographer to control the direction and radius of the light beam. Snoots can isolate a subject when using a flash. The snoot directs the light.


Reflector Dish - Reflects the light in order to create a more concentrated beam. 


Honeycomb - The honeycomb grid is a tight structure and is usually found affixed to the front of a studio strobe or can be alternatively fixed to an off camera flash. The light shines through the grid and creates a beam of light with the aim of creating a focused beam with little diffusion. It restricts the light path. 


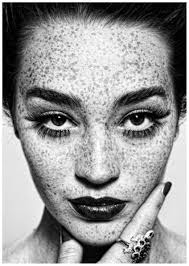
Irving Penn is an American photographer who is known for his fashion photography, portraits and still life shots. Penn's career included work at the Vogue magazine as well as independent advertising work for clients including Issey Miyake and Clinique. Below shows a selection of his work:


Tuesday 1 December 2015

Editing - Print Conventions and Preparation of Final Images

Print Conventions - Definitions

PPI - This refers to the numbers of pixels per inch in the images. This will affect the print size of the photo and will affect the quality of the output. 
72 PPI - Used for websites and images in digital form.
300 PPI - Used when printing images.

White Balance Adjustment - The colour balance on a digital camera. It is the process of removing unrealistic colour casts. This allows objects that appear white in person to also appear white within the image.

Colour Temperature - Refers to the measure of a lights colour. A cold colour temperature would be towards the blue end of the spectrum whereas the warmer images are more towards the red end of the spectrum. 

Dodge - Makes the image brighter.

Burn - Makes the image darker.

Print Resolution - The degree of sharpness of a printed image. Resolution is defined by pixels per inch.

Healing Brush - An intelligent paint tool which is similar to the clone stamp tool. The tools allows the covering of blemishes. 

Clone Stamp Tool - Photoshop's clone stamp tool allows you to duplicate part of an image. 

Hue - A colour or shade.

Saturation - Used to refer to the intensity of a colour within an image. 

Levels - Used to correct the tonal range and colour balance of an image by adjusting the intensity of the images shadows, mid tones and highlights.

Curves - Assists with the adjusting of points through an image's tonal range.

Editing

Editing using Photoshop

Curves and Hue and Saturation 

For this image, I used Photoshop to alter the brightness, saturation and curves in order to achieve a brighter and more eye-catching final photograph.


This screenshot shows when I was adapting the curves. 

This screenshot shows when I was adapting the saturation. Although I did not increase the saturation much, I think that the little that I did increase it made the overall image more effective.
Before -


After -

Evaluation -

I think that my final edited image looks much more effective than the original. I like the way that the edited version of the image is much brighter and also like that the background is much whiter and more bold which assists the image in catching the audiences eye. In addition, I like the way that the figure is made bolder by the increase of saturation as it allows the person to stand out more against the white background. 


Levels

I altered the levels in order to change the lighting and brightness in the image.

Before -
 After -


Evaluation -

I think that the adapted levels of the image helps to make the images more bold and striking to look at. I like how the colours are also bolder and more vibrant as this helps to make the images more eye-catching and attractive to the eye. This edit also allows the presentation of more detail within the image. 


Dodge and Burn

With the below image, I edited with the dodge and burn tool on photoshop. I like the way that this tool can create more intricate darker and lighter effects within the images. To use the dodge and burn tools, I used the 'select' tool to select the area I wanted to apply the effect too. I then selected either the 'dodge' or 'burn' tool and applied them to the selected area of my image. 

Firstly, I edited the curves of the image to increase the brightness and also make the darker colours bolder. 


I then also edited the hue and saturation and increased the saturation to make the image bolder and more striking. 


I then experimented with the dodge tool and the burn tools to create darker and lighter effects within the image.

Before -

After -


Evaluation -

I like the outcome of my first attempt using the dodge and burn tools. I think the outcome is effective in presenting the effect and it clearly shows the darker and lighter areas. However, if I were to do this again, I would make the effect more subtle as I think that this would look more effective. On the whole, I am not overly satisfied with my first attempt at using the dodge and burn tools. However, I then also experimented with another image and feel that the more subtle use of the tools makes the image appear slightly more effective.


White Balance

I then used white balance to improve the following image.

Firstly, I began with my original image.

Then, I selected the levels shortcut and then selected the middle/bottom pipette icon depending on how bright the image is needed to be. 

Before -


After -

Evaluation -

I think that the image looks much more effective in the edited version where the white balance has bee applied. It has made the image much more striking and bright which therefore helps it to appeal to the audience and attract attention.


Selected Colour Manipulation

Firstly, begin with the original image.


Select the desired area of the image using the 'select' tool. 


Once you have the desired area selected, click 'select' and then 'inverse'. This will allow for making the background black and white and leaving the originally selected are left in colour. 

You are then able to alter the hue and saturation of the originally coloured selected area. To do this I deselected the selected area and altered the colour to turquoise and also increased the saturation. 

Before -


After -

Evaluation -

I think that this technique is effective and is useful in some particular images. I like how I was able to change the hue of the selected coloured area and also like how the black and white background complements the coloured areas within the image.